Image Credit: Shutterstock
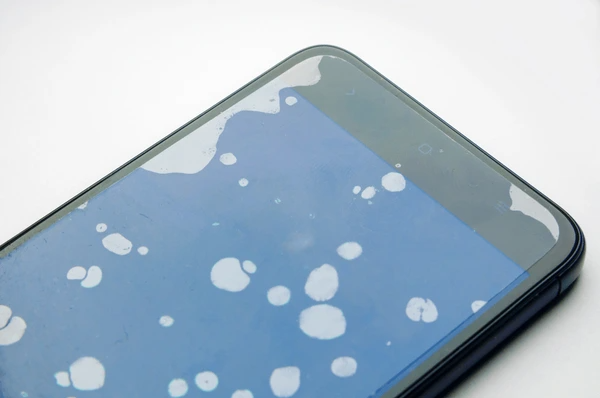
Air bubbles under your screen protector are a common frustration, but they don’t have to ruin your phone’s aesthetic or functionality. Whether you’ve just installed a new screen protector or have been using one for a while, learning how to get air bubbles out of screen protector is essential for maintaining a clean and smooth surface. In this guide, we’ll cover quick fixes, tips for prevention, and some common myths about air bubbles, ensuring you can tackle the issue with ease.
What Causes Air Bubbles in Screen Protectors?
Before we dive into solutions, it’s important to understand why air bubbles appear in the first place. While it may seem like an inevitable problem, knowing the root causes can help you prevent them in the future.
Also Read: How to find lost AirPods that are offline and dead
1. Poor Application Technique
One of the most common reasons for air bubbles under screen protectors is poor application technique. If you’re not aligning the screen protector properly or pressing down too quickly, bubbles can form easily. It’s essential to apply the protector slowly and carefully, starting from one side and working your way across to avoid trapping air.
2. Dust and Debris
Even the smallest speck of dust can cause air bubbles. Dust particles create gaps between the screen and the protector, leading to unsightly bubbles. This is why cleaning your screen thoroughly before application is so important. If you skip this step, those tiny pieces of debris will remain trapped under the protector, making the bubbles almost impossible to remove without peeling it off.
3. Quality of the Screen Protector
Not all screen protectors are made equal. Low-quality protectors often don’t adhere to the screen as effectively as higher-quality ones. They might form bubbles more easily or struggle to stay flat against the screen. Investing in a high-quality screen protector can minimize the chances of air bubbles occurring in the first place.
Simple Tools You Need to Remove Air Bubbles
Fixing air bubbles doesn’t require a ton of expensive tools. In fact, a few simple items that you likely already have at home will do the trick.
1. Plastic Card or Squeegee
A plastic card or squeegee is one of the most useful tools when it comes to removing air bubbles. These tools allow you to gently push out the trapped air without damaging the screen protector. When using a card, make sure it’s smooth and not sharp, as sharp edges could scratch the protector.
2. Microfiber Cloth
A microfiber cloth is perfect for cleaning your screen before and after applying a protector. It can also be used to wipe away any excess moisture or dust that might remain after smoothing out the bubbles. Its soft, lint-free fabric ensures you won’t accidentally add more debris to the surface.
3. Tape for Dust Removal
If dust particles are stuck under the screen protector, you can use tape to remove them. Simply use a piece of clear tape to gently lift the dust off the screen before reapplying the protector. This step can make a huge difference in preventing future bubbles from forming.
Step-by-Step Guide: How to Get Air Bubbles Out of Screen Protector
Now, let’s walk through a step-by-step guide to get air bubbles out of your screen protector effectively. These steps can be followed whether you’re applying a new protector or fixing an existing one.
1. Clean the Screen and Protector
The first step in bubble removal is to make sure the surface is clean. Use a microfiber cloth to wipe down your screen and remove any dust, fingerprints, or oils. Also, clean the screen protector itself to remove any contaminants that could affect the adhesive. If necessary, use a cleaning solution designed for screens to ensure a completely smudge-free surface.
2. Start from the Center
When applying or fixing the screen protector, start from the center of the screen and work your way outward. This method helps to push the air bubbles towards the edges, making it easier to smooth them out. Avoid starting at the edges as this could trap air in the middle of the screen.
3. Use a Plastic Card for Smoothing
Once the protector is in place, take your plastic card or squeegee and gently press it from the center to the edges. This will push the air out from under the protector. Make sure to use gentle but firm pressure to avoid damaging the screen protector. Repeat this process until most of the air bubbles are gone.
4. Work Slowly and Carefully
It’s essential to take your time during the application process. Rushing can lead to more air bubbles or an uneven fit. Work slowly and methodically to ensure the protector adheres smoothly to the screen without trapping any air.
5. Apply Gentle Heat if Necessary
If you have stubborn bubbles that won’t come out, a bit of heat might help. You can use a hairdryer set to a low heat setting. Hold it about 4–6 inches from the screen and gently heat the protector. The warmth can soften the adhesive, allowing the air bubbles to escape more easily. However, be cautious with this method, as too much heat can damage the protector or your device.
Tips for Preventing Air Bubbles During Screen Protector Installation
While air bubbles are a common issue, there are several ways to prevent them from happening in the first place.
1. Clean Your Screen Thoroughly
Before applying your screen protector, make sure your screen is spotless. Use a microfiber cloth and a screen-safe cleaner to remove any oils, dust, or fingerprints. Even the smallest particle can cause a bubble, so make sure the surface is perfectly clean.
2. Choose a High-Quality Screen Protector
Opt for a high-quality screen protector with strong adhesive. Cheap protectors often don’t stick as well, leading to more air bubbles. Look for brands with good reviews and reputations for quality.
3. Proper Alignment and Steady Hands
Make sure you align the protector perfectly before sticking it to the screen. Take your time to position it carefully and avoid pressing down prematurely. Use a steady hand to avoid shifting the protector once it’s in place.
What to Do If Air Bubbles Remain After Trying to Remove Them
Sometimes, air bubbles are persistent and won’t go away despite your best efforts. Here’s what you can do if this happens.
1. Let the Bubbles Settle Over Time
Some bubbles, especially the tiny ones, will disappear on their own after a few hours or days. The adhesive might need time to settle and bond with the screen. If you can live with the small bubbles for a little while, this could be the easiest solution.
2. Reapply the Screen Protector
If the bubbles remain stubborn and you’re not satisfied with the results, you may need to peel off the protector and try again. Carefully remove the protector, clean the screen, and reapply it slowly, following the steps outlined above.
Common Myths About Air Bubbles and Screen Protectors
There are several misconceptions about air bubbles that can make people nervous or unsure about how to deal with them. Let’s clear up some of the most common myths.
1. All Air Bubbles Can Be Removed
While most bubbles can be smoothed out, some are simply impossible to remove completely, especially if they’re caused by imperfections in the screen protector or the adhesive.
2. Air Bubbles Will Ruin Your Screen
Don’t worry—air bubbles won’t damage your screen. The screen protector is there to protect your device, and the bubbles won’t interfere with its functionality. While they can be annoying, they don’t pose a serious risk.
3. Heat Will Always Solve the Problem
Although heat can help in some cases, it’s not a cure-all. Applying too much heat can cause the screen protector to warp, bubble, or even peel off completely. Use heat sparingly, only when necessary.
Conclusion
Air bubbles under a screen protector are a common issue, but they don’t have to be a dealbreaker. By following the tips and tricks shared in this article, you can remove most bubbles and prevent them from happening in the future. Remember, patience and careful application are key to achieving a smooth, bubble-free screen protector.
Also Read: How to find lost AirPods that are offline and dead
FAQ: How to Get Air Bubbles Out of Screen Protector
1. How Do I Get Rid of Tiny Air Bubbles?
Tiny bubbles often disappear on their own over time. If they persist, gently press on the bubbles with a plastic card or use heat to help remove them.
2. Can I Use a Hairdryer to Remove Air Bubbles?
Yes, you can use a hairdryer on low heat to soften the adhesive and help remove stubborn air bubbles. Just be sure not to overheat the screen.
3. Is It Better to Use a Plastic Card or a Squeegee?
Both tools are effective, but a plastic card is more commonly used. A squeegee is also useful, especially if it has a soft, rubber edge.
4. Can I Fix Air Bubbles on a Curved Screen Protector?
Yes, but it can be trickier. You may need to use more precise techniques, such as gently heating the protector or reapplying it carefully.
5. How Can I Prevent Dust from Getting Under My Screen Protector?
Make sure to clean your screen thoroughly with a microfiber cloth before applying the protector. You can also use a dust removal sticker included with some screen protectors.
6. Should I Remove My Screen Protector If Bubbles Don’t Go Away?
If the bubbles remain after several attempts, it might be best to remove the protector, clean the screen, and reapply it carefully.


